
Glute Bridge: Proper Form, Step by Step
Learn glute bridge proper form with step-by-step setup, execution cues, breathing and tempo, plus common mistakes and fixes — safety-first and evidence-aware.
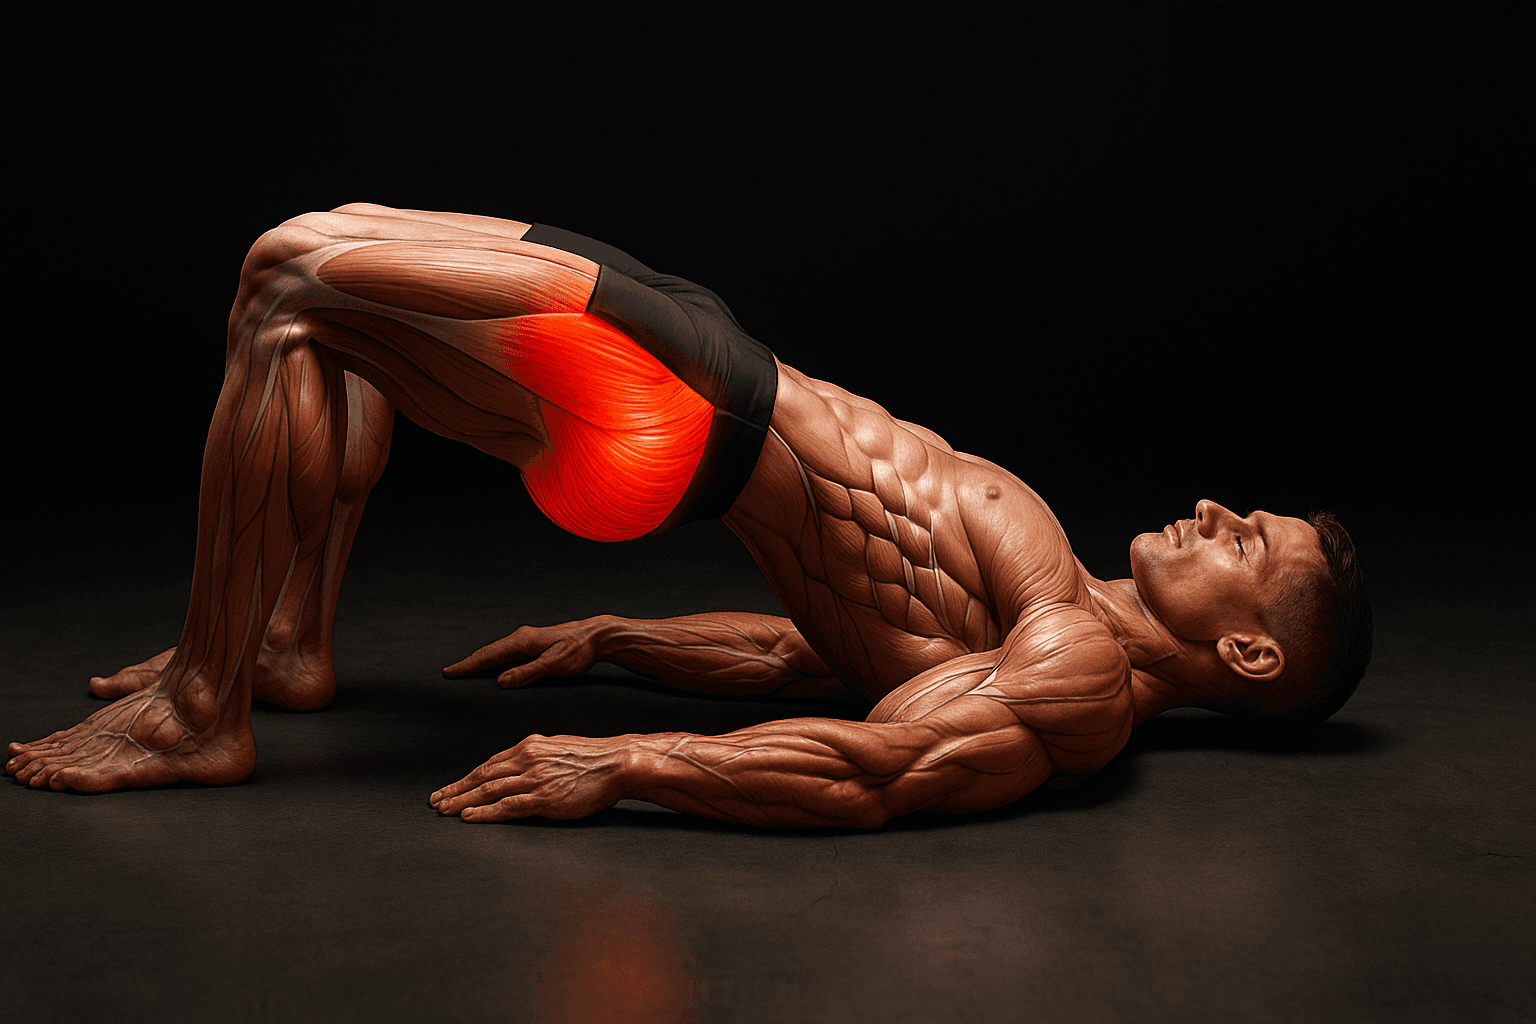
Photo by RepBro.
Yes — the proper form for a glute bridge is to lie on your back with feet hip-width apart, knees bent near 90°, then drive through the heels to lift the hips until your torso forms a straight line from shoulders to knees while squeezing the glutes and avoiding low-back overextension. Below is the step-by-step setup, execution cues, breathing, tempo, common mistakes with fixes, and a short safety note.
What is the correct setup before I lift?
- Surface and position: lie on a firm surface or mat. Knees bent, feet flat on the floor, hip-width apart. Heels should be about 20–30 cm (8–12 in) from your butt; adjust so your shins are roughly vertical when at the top.
- Foot orientation: toes point forward or slightly out — don’t flare the feet outward. Keep weight distributed through the heels and mid-foot, not the toes.
- Hands and head: arms rest comfortably at your sides, palms down. Keep your neck neutral; eyes can look up at the ceiling.
- Spine and ribcage: start with a neutral spine — small natural curve in the low back. Tuck the ribcage down slightly so you’re not arching through the upper back.
How do I perform the glute bridge, step by step?
- Brace: take a moderate breath in and brace your core (think about a gentle belt around the midsection). This helps stabilize the pelvis.
- Drive: exhale as you press through both heels and squeeze the glutes to lift your hips. Focus on hip extension rather than lumbar extension: the motion should come from driving the hips up, not overarching the lower back.
- Top position: stop when your torso forms a straight line from shoulders to knees (hips aligned with shoulders and knees). Hold a strong glute contraction for 1–2 seconds.
- Lower: inhale and lower your hips under control until your buttocks lightly touch the ground (don’t slam). Repeat for the planned reps.
Execution cues to use: “drive through the heels,” “squeeze the glutes,” “keep ribs down,” and “stop when hips are level with shoulders.”
What tempo and breathing should I use?
- Tempo (unloaded/control focus): 2-0-2 (2 seconds up, 0-second pause while maintaining the squeeze for 1–2 seconds, 2 seconds down). This tempo emphasizes control without rushing.
- Tempo (strength focus with load): 1-0-2 or explosive concentric 1-up, controlled 2-down. If you add resistance (band, barbell, or dumbbell), prioritize a controlled eccentric.
- Breathing: inhale to prepare before the concentric; exhale during the lift or at the peak contraction. Keep breathing steady; do not hold breath for multiple reps.
What are common mistakes and how do I fix them?
- Mistake: Overarching the low back at the top (lumbar hyperextension).
- Fix: Stop lifting when hips are level with shoulders; cue "tuck the pelvis slightly"; engage the core to prevent the lower back from taking the movement.
- Mistake: Lifting with the hamstrings or lower back instead of the glutes.
- Fix: Move feet slightly closer to hips (reduce forward foot distance) to increase glute involvement; consciously squeeze the glutes at the top and focus on driving through the heels.
- Mistake: Pushing through the toes and letting knees collapse inward.
- Fix: Keep weight through heels/mid-foot; cue "knees in line with hips and feet" and gently press knees outward against a light band or your hands if needed.
- Mistake: Fast, uncontrolled reps that use momentum.
- Fix: Slow the eccentric (lowering) phase to 2 seconds and maintain a 1–2 second isometric hold at the top.
- Mistake: Asymmetrical lift (one hip higher than the other).
- Fix: Check foot placement and hip rotation; practice single-leg bridges to identify weakness and correct muscular imbalances.
How can I progress or regress the glute bridge?
- Regressions: reduce range of motion, perform glute bridges to a box or pad, or perform shorter holds. Bodyweight is fine for mastering form.
- Progressions: add a band around knees to increase glute medius demand, place a dumbbell or barbell across the hips for load, or do single-leg glute bridges to increase difficulty.
Is the glute bridge safe?
Short safety note: stop if you feel sharp or radiating pain; if pain persists, consult a qualified professional. This guide focuses on safe form cues but is not a medical diagnosis.
How should I program glute bridges into my training?
If your goal is activation and technique, use 2–4 sets of 8–15 reps with deliberate tempo and emphasis on contraction. For strength, add external load and use lower reps (4–8) with 2–4 sets. Track sets, tempo, and progression to avoid plateaus — tools like the RepBro app can help you keep consistent records.
Quick checklist before you start a set
- Feet ~20–30 cm (8–12 in) from hips and hip-width apart.
- Neutral neck and rib position, core braced.
- Drive through heels, squeeze glutes at the top, avoid low-back overextension.
- Controlled tempo (2-0-2 recommended) and steady breathing.
One-sentence honest takeaway: Master the glute bridge by keeping feet close, driving through the heels, holding a deliberate top squeeze, and avoiding low-back overextension — stop if you feel sharp pain and consult a professional.
Frequently asked questions
- How high should I lift my hips in a glute bridge?
- Lift until your pelvis is roughly in line with your knees and shoulders — a straight line from shoulders through hips to knees — without hyperextending the low back.
- How many reps/sets are best for glute bridges?
- For form and activation, 2–4 sets of 8–20 reps is common; lower reps with added load for strength, higher reps for endurance. Adjust based on goals and recovery.
- Can glute bridges help low back pain?
- Glute bridges can improve hip extension strength and pelvic control, which may help some people, but stop if you feel sharp pain and consult a professional for persistent issues.


